Auckland · 2026 Edition
Recladding Timeline Auckland: Week-by-Week Through a 5-Month Reclad Project

A typical Auckland house reclad takes 4 to 6 months on site, plus 2 to 4 months of investigation, design, and consent before that. If you’re planning a reclad in 2026, expect to spend a year from first phone call to final paint inspection. This guide walks through what actually happens each week so you know what to expect, what your role looks like, and where the unavoidable bottlenecks sit.
Pre-site: weeks 1–12 (no work on the home yet)
Weeks 1–2: Initial assessment and weathertightness investigation
Free initial site visit. Moisture readings at high-risk junctions to confirm whether a full paid investigation is needed. If the symptoms warrant it, a full weathertightness investigation report is commissioned ($2,500–$5,000), which takes 1–2 weeks to complete and includes invasive testing, framing condition assessment, and written findings.
Weeks 3–4: Scope, concept design, and QS estimate
Architect or designer measures the home and produces concept drawings showing the proposed cladding system, any layout changes, and the reclad scope. Quantity Surveyor works from the drawings to produce a line-by-line cost estimate that becomes the basis of the fixed-price quote. Client reviews the concept and gives feedback before detailed design proceeds.
Weeks 5–6: Detailed design and consent documentation
Detailed drawings, cladding specification, structural engineering input where needed, LBP records, producer statements, and the building consent application package. For most reclads, building consent only is required — resource consent comes into play only if the reclad materially changes the home’s external appearance and the home sits inside a Special Character Area overlay.
Weeks 7–12: Auckland Council building consent
Building consent for residential alterations typically takes 20 working days (4 weeks) once lodged with Auckland Council, but requests for further information (RFIs) regularly extend this by 2–4 weeks. We answer RFIs promptly to keep the timeline tight. Use this window to finalise material selections (cladding colour, paint, any joinery upgrades), confirm contract terms, and book the site start date.
On-site: the 5-month build
Week 1: Site setup and scaffold
Scaffold erected around the home, site fencing installed, weather protection prepared. Existing landscaping and paths protected. Power and water connections confirmed. Client removes any items from exterior walls inside (paintings, shelves) that might be affected by vibration during cladding removal.
Weeks 2–3: Cladding strip-out and framing exposure
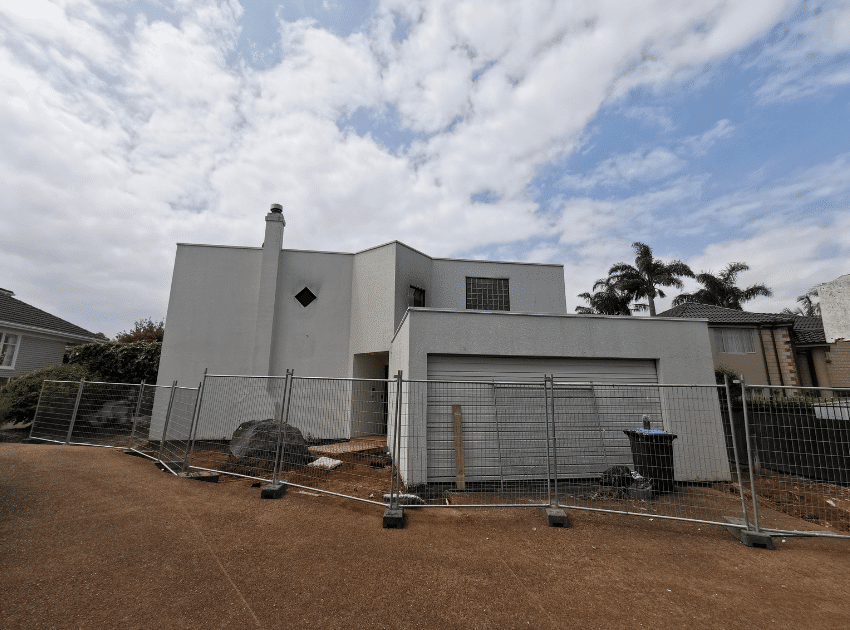
The existing cladding is removed in a controlled sequence, typically one elevation at a time. Building wrap and any battens behind are pulled. The framing is exposed for full inspection. This is the “moment of truth” week — the team documents every framing member with photographs, identifies any damage beyond the original allowance, and discusses with the client before any extra work proceeds.
On the Epsom plaster home reclad, the framing damage came in at 22% replacement — right at the upper edge of the 15–25% allowance we’d built into the fixed price. No variation needed; project stayed on the original contract price.
Weeks 4–6: Framing repair and replacement
Rotted or wet framing is cut out and replaced with H1.2 treated timber to current Building Code. Bottom plates, corner studs, and wall intersections are the most common replacement zones. Every replaced framing member is documented for the inspector. New flashings to current E2/AS1 standards installed at all critical junctions: window heads, sills, jambs, door surrounds, deck-wall interfaces.
Weeks 7–8: Building wrap, cavity battens, and pre-cladding inspection
Approved building wrap (typically a synthetic underlay rated for cavity systems) installed across the entire wall area. Cavity battens fixed vertically over the wrap to create the drained cavity behind the cladding. Council inspector visits to inspect framing, flashings, wrap, and cavity install before any cladding goes on — this is one of two critical inspection points in the project.
Weeks 9–14: Cladding installation
The new cladding goes on. Order depends on cladding type and home layout, but typically starts at the lowest course of each wall and works up. Fibre cement and weatherboard installs progress at roughly 15–25m² of wall area per day for a skilled team. A 250m² wall area home takes about 4–5 working weeks for cladding install alone. Joinery (windows and doors) is removed, properly flashed, and reinstalled as the cladding reaches each opening.
Weeks 15–17: Trim, sealant, and exterior detailing
Corner trims, window and door surrounds, sealant beads at all junctions, eaves and soffit detailing. This is the work that separates a good-looking reclad from a great-looking one — the trim and sealant detailing controls how the home reads from the kerb.
Weeks 18–19: Exterior paint preparation and base coats
Cladding cleaned, sanded where needed, and prepared for painting. Sealant beads cured. Primer applied to any site-cut edges or repaired areas. First coats of exterior paint applied on the prepared cladding.
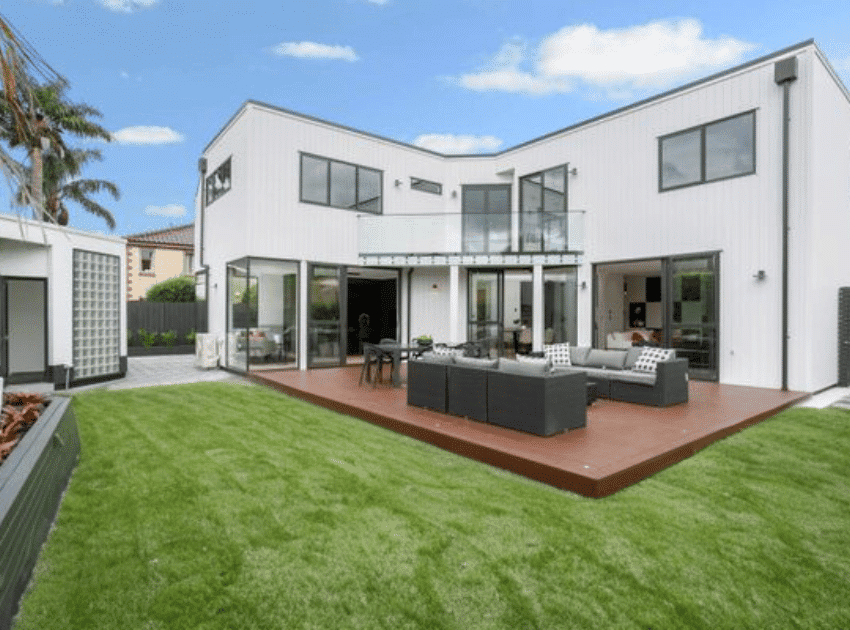
Week 20: Final paint coats and trim painting
Top coats applied. Trim and accent colours painted. The home transforms visually in this week — what looked like grey board for the previous 18 weeks becomes the finished home.
Week 21: Scaffold removal, site clean-up, and final inspection booking
Scaffold comes down. The home is visible from the street for the first time since week one. Site is cleared, paths and landscaping reinstated. Final building inspection is booked with Auckland Council.
Week 22: Final Council inspection and CCC
Auckland Council inspector visits to verify all work matches consent documentation. With a complete documentation pack (framing photos, producer statements, LBP records, materials specs), inspections typically pass on the first visit. The Code of Compliance Certificate (CCC) is issued within 1–2 weeks of the passing inspection.
Weeks 23–24: Touch-ups, handover, and Master Builder Guarantee
Any final touch-ups identified at the inspection or final walk-through are completed. Handover documentation is provided to the client: consent paperwork, CCC, producer statements, paint and material specifications, the Master Builder 10-Year Guarantee certificate, and a maintenance schedule for the new cladding.

Total project timeline summary
What can shorten the timeline
- Smaller home or single-storey — 130–150m² single-storey reclads can be done in 14–16 weeks on site.
- Sound framing — if no significant framing replacement is needed, you save 1–3 weeks in the strip-out phase.
- Cladding system continuity — reclading like-for-like (weatherboard back to weatherboard) doesn’t trigger resource consent and can sometimes use a simpler consent pathway.
- No joinery changes — reusing existing windows saves 2–3 weeks vs replacing them mid-reclad.
- Decisive material selections early — long delivery times on specific cladding products (some imported items can run 8–12 weeks) hold up site progress when not ordered early.
What can extend the timeline
- Auckland winter weather — sustained rain delays scaffold work, framing inspection, and cladding install. May–August reclads typically run 2–4 weeks longer than November–March projects.
- Council RFI cycles — complex reclads can trigger multiple rounds of RFIs adding 4–8 weeks to consent.
- Extensive framing damage — beyond the standard 15–25% allowance can add 2–4 weeks for additional structural work.
- Combined projects — reclad plus second storey, reclad plus full renovation, etc. adds the project-specific time on top.
- Heritage or special character overlays — resource consent adds 6–12 weeks; design review by Council heritage planners adds further time.
- Material delivery delays — specific cladding products (particularly imported timber weatherboards or certain Hardie ColorPlus profiles) can have 8–12 week lead times.
Living in the home during a reclad
Most Auckland reclads happen with the clients still living in the home. The work is on the exterior; the interior stays habitable. What you should expect:
- Scaffold for 5 months — you’ll have scaffold close to your windows, affecting natural light and privacy for the duration.
- Daily noise — cladding removal weeks are the loudest (drills, saws, debris management). Framing repair and install weeks are quieter.
- Occasional power interruptions if joinery needs to come out and electrical work needs to happen.
- Site access for builders from 7am to 4:30pm weekdays. Site is closed weekends unless agreed otherwise.
- Temporary loss of outdoor amenity — decks, paths, and outdoor seating areas are usually inaccessible during scaffolding.
Some clients relocate temporarily for the loudest phase (typically weeks 2–6 during strip-out and framing). Others stay through the whole build. Whichever you choose, build the decision into the project plan early so the contract reflects it.
What makes a project come in on time
Three things separate on-time reclads from delayed ones:
- A complete consent package the first time, with engineering, producer statements, LBP records, and material specs all attached. RFI cycles are where most of the “hidden” project time disappears.
- Decisive client decisions on cladding, paint colour, and any combined work at the design stage rather than mid-build.
- A builder with their own scaffolding, project management, and trade availability. Multi-party coordination delays add weeks to almost every reclad. Our design-and-build model under one team for the full reclad removes most of these coordination delays.
Frequently asked questions
October through February is the ideal start window in Auckland. Strip-out and framing exposure happen in dry weather, cladding install benefits from settled conditions, and the project finishes before winter. May through August starts are still feasible but typically run 2–4 weeks longer because of weather delays.
Yes, in most cases. If your windows are structurally sound and not the source of weathertight failure themselves, they’re removed during the strip-out, properly flashed during the rebuild, and reinstalled into the new cladding. The cost saving versus replacement is $15,000–$40,000 on a typical home. Some clients take the opportunity to upgrade to double-glazing while the joinery is out anyway; that adds back $20,000–$60,000 depending on home size.
The Master Builder contract includes a project completion date. Genuine weather delays, council delay (RFIs, inspection scheduling), and client-instructed variations extend the date legitimately. Builder-caused delays are addressed in the contract terms. The key protection is the fixed-price structure — the dollar amount doesn’t change with time, only the calendar does.
Weekly at minimum. We do a formal site walk-through every Friday with the client, going through the past week’s progress, any decisions needed for the coming week, and any variation discussions. Written updates go with the walk-through. Out-of-hours questions are routed through your project manager.
Anything within the scaffold footprint is at risk — established plantings, garden beds, paving along the house, decks. We protect what we can and document everything before site setup. Reinstatement costs for damaged landscaping should be specified in the contract: who pays for what if something dies, gets damaged, or needs to be moved.
Often the smartest move. Sharing scaffold, consent, project management, and disruption period across two projects saves typically 15–25% on the combined cost versus doing them separately. Adds 4–12 weeks to the overall timeline depending on the extension or renovation scope. Most of our recent Auckland reclads have included at least some interior or structural work alongside the cladding replacement.
50 things to confirm before, during and after your renovation — covering scope, contracts, consents, site protection, payments, snag lists and handover. The exact pre-flight check we use on every AVR project.
Plan your reclad timeline
Three ways to move forward — an instant estimate, a free on-site consultation, or our renovation ebook.
Get an instant estimate → Book a free consultation → Download the 7 Things ebook →